Tag: weed

  • Growing Outdoors This Year?

    If you have been thinking about growing outdoors this year, right about now is when you should be laying the foundations for a nice little patch somewhere. Here are some tips to get you started.

    Choosing a site; Get a map of your local backroads, there are old logging roads, forestry access roads, and fishing lake roads that can get you far off enough into the bush that you stand a decent chance of not being discovered. Toss some gas in the tank, and head for the hills.

    You are looking for a spot that will give you a few advantages, I like going to a remote fishing lake, finding the feeder stream to that lake, and taking a good long hike up that stream. If you find the going tough, good, the more shit you go through getting to your site, the less likely anyone will follow your trail up there. As well, areas near streams have natural groundwater, and you will not have to water your plants as long as they have a chance to develop good roots before things dry out in the summer.

    The ideal spot is a clearing near a stream, you need to be sure your plants will get sun too, so don’t pick a site too near a steep rock wall or anything that will keep your plants in the shade for too much of the day. Clearings at the bottom of south facing slopes are also ideal. Areas that have been logged not too recently are good as well, but don’t choose one where the trees are less than 3m/12feet high as these areas are visited regularly by brushing crews and forestry workers.

    Once you think you have a good spot, dig down a bit into the soil. If there is a tough mat of compacted grass you might want to reconsider, as the grasses could choke out your plants. Hopefully you find a foot or so of topsoil, and sand and gravel under that. If you are going to grow under less than ideal conditions it is not impossible, it just means you might have to visit them more often to feed and water them.

    Once you have selected a site, come back a few times to make a stash of materials and hopefully find a few different routes from where you park to your site, rotating your routes to your site will prevent you from making too much of a trail. You should bring up your garden shovel, a couple of empty 20 gallon water jugs, and your 10-10-10 fertilizer before planting to avoid having to pack these things in during summer months when you stand a better chance of being spotted. Hide your goods under a brush screen or in a dugout under a fallen log, make sure your fertilizer is double bagged.

    Prep your site by digging a 1.5 foot hole for each plant, and clearing the brush away in a 1 foot radius around each hole.

    Then pack in your peat pots and soil. Peat pots are planters made from compressed peat moss. They will be sufficiently broken down by the time your plants roots need to go deeper. Use 12′ peat pots filled with standard potting soil. Put one into each of your holes, fill in around it. If you have easy access to a creek, cover each pot with creek stones. This will help keep moisture in the soil underneath them.

    Prepping your plants; You will want to get your plants in as soon as you know you can do it without worrying about frost. Keep track of your local garden store, wait till they are selling tomato and pepper plants. Then wait another week, just to be safe.

    If you are starting with clones, make sure they are well rooted, and getting new growth. If you are starting from feminized seeds, germinate them and wait until they are at least 4 inches high. If you are starting with regular seeds, start two seeds for each plant you want to produce as you will have to weed out some males.

    Hopefully you don’t traumatize your plants too much taking them up to the site. Cutting a 500ml pop bottle in half, putting your plant into it, and then taping it up is an ideal transport method.

    Put the seedlings/clones into your perfectly set up pots, burying each one at least 1 inch above the roots.

    Don’t hit them with too much fertilizer in the beginning, a very light sprinkle is good. Go home, sleep well, and trust in nature for a couple of weeks. Then check your patch, maybe bringing along some clones to replace any plants that didn’t make it.

    See you in April for pest control tips.

    Alternate method; find some secluded land and plant a dozen clones, come back in early October, might be good, might be gone.

    C/O
    “I was the king of grade 11, why?, because I had 3 lbs of grass in my closet, that’s why”

    Discuss http://www.totse.info/bbs/showthread.php/11250-Growing-outdoors-this-year
    Growing Outdoors This Year? by DarthBeaver

  • Roll a Cross Joint

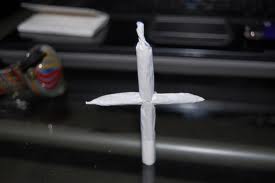
    Roll a Cross Joint

    Cross Joints

    What you need:
    * You will need four or five rolling papers of your choice. Two will be used for just the sticky strip.
    * Then a small pointy object.
    * A pair of scissors.
    * A Lighter.
    * A Couple of grams of your smoking mixture (Shisha, Tobacco)

    How to make:

    *Break up your weed (add tobacco if you wish)

    *Split your weed into two of your rolling papers. One of your joints should be significantly larger than the other because it will need to stay together when a hole is poked through it. I usually make my bigger joint into more of a cone shaped joint so the one end is much bigger then a regular joint.

    *Poke a hole into your fat joint somewhere in between the middle of the joint and the (fat) end of it. It should be a big enough hole so the littler joint just fits through it. You then want to poke a little hole in the second smaller joint so the smoke from it can come in through the middle of the joint.

    *Insert the little joint into the hole of the bigger joint. You want to have just about the same length for each part of the joint that you are going to be lighting (the three points) because you don’t want one end to burn a shorter distance and have the other two ends of the joint to just fall off when it burns the middle point where the 3 ends should meet.

    *You now want to take the other 2 rolling papers and cut off the glue strips with your scissors. Take them and wrap them around the cross diagonally so they can seal up any little holes that can make it harder to puff on the joint. You should end up with an X pattern made by the 2 strips on both sides of your cross joint.

    Now you’re ready to smoke the cross joint. Light all 3 ends simultaneously (you might need a friend to help you) and then smoke it up. IMO the cross joint isn’t any better then smoking 2 regular joints and it’s kind of a waste of money and weed but it’s definitely an experience to smoke one and you feel like Jesus when you do.

    Happy smoking.

    Discuss http://www.totse.info/bbs/showthread.php/4829-Roll-a-cross-joint

  • How To Make a Gravity Bong

    Gravity Bongs

    Gravs are my favorite way to smoke because not only does it hit you fucking hard but it hits you fast too. From what i’ve read gravity bongs are the second best way to get as much THC from weed as possible right behind vaporizers. In this thread i will tell you how to make one of these epic bongs.

    What you need:
    A bottle (water, gatorade, 2-liter, etc.)
    a bowl with a stem or a socket
    a bucket that is about the same size as the bottle
    a lighter
    weed

    How to assemble:

    1. First you want to take the bottle and make a hole in it’s cap. This can be done with a screwdriver or drill or with a pen and some strength. The hole should be about the size of your stem or socket because this is what will hold it in place.

    2. Next you will want to take your lighter and burn 4 or 5 little holes at the bottom of the bottle (on the sides, not literally on the bottom). you want them to be about an inch apart and burned all the way around the bottle.

    3.Then you want to fill your bucket with water almost to the top of the bucket.

    4. To test out if you made your holes big enough, place the bottle into the water right side up and the water should go through the holes in the bottom into the water bottle.

    5. To test out if your bowl and cap are properly fitted, screw the cap onto the water bottle and put your thumb over the bowl. now lift the water bottle and the water should stay in the bottle until the bottle is completely out of the water in the bucket.

    How to use:

    • First put the water bottle into the bucket that is filled with water and make sure that your bottle is filling up with water.
    • Now load your bowl with as much weed as you want to pack it with and screw the cap onto the water bottle.
    • Keep one hand on your bottle and use the other hand to grab your lighter and start lighting the weed.
    • As you light the weed you want to pull the bottle up so that the water that is coming out of the bottom is being displaced with smoke from the weed.
    • Keep doing this slowly until your bottle is about to come out of the water and then, while still holding the bottle, put down the lighter and unscrew the cap.
    • Right after you do this you are going to want to lift the bottle out of the water and breathe in all of the smoke in the bottle
    • Now repeat these steps over and over until you’re ripped.

    Side Notes:

    1. Make sure that your weed isn’t packed too tight in the bowl because you want a little bit of air to be able to get into the water bottle when the water is being displaced or else you will be burning weed and no smoke will be in the bottle.
    2. If you’re using a socket you might want to get a screen or just use a small socket because the weed might just fall into the water if you’re not careful or if it’s not packed enough.
    3. If you don’t want your smoke to be harsh then before you suck the smoke in, push the bottle into the water and then suck some water into the bottle. Lift out the bottle and keeping sucking and you will have a bubbler effect going on at the bottom of the bottle.
    4. Some people like to just cut the bottom of the bottle off and instead of lifting the bottle out of the water they just put their mouth on it and push down as they breathe in. Even though it achieves the same effect you will find that, the higher you get, the harder it will be to keep the bottom of the bottle in the water.
    5. The good thing about using 5 holes is that when you lift the bottle out of the water, no smoke will escape from those holes but with the bottom cut off of the bottle, smoke will pour out and will be wasted on nothing.
    How it should look when you pull it up
    Gravity Bong
    What the bottle should look like
    (it’s basically a watefall bong but with more holes and unlimited water)