Tag: windows

  • Dual/Triple Display Using Two GPU’s (Onboard/ PEG / PCI) Simultaneously

    I am using an Nvida 8500GT, due to overheating the DVI port wouldn’t work correctly. The GPU has two display paths and one of them has an internal malfunction because of which I can’t get the color Red to display. Basically it outputs BG instead of RGB.

    Today while trying to fix Hard Disk issue I decided try something simple. I went into my Integrated Perpherical settings and under Video I selected Always on.
    dual display

    I am using Intel 965 Express Chipset and a PCI-Express Graphic card. Enabling always on will fire up both the chipsets.

    After that just connect monitors and fire up Windows 7. Once booted Windows will start installing Graphic drivers.

    Then goto Screen Resolution,
    dual display
    Press Detect and then set the primary display.
    dual display

    After that click on Extend These Displays and you’re done.

    dual display

    You may have issues configuring things but if you’re facing the same shitty problem as me, this is an ideal solution. Not all motherboards support this.

    Discuss http://www.totse.info/bbs/showthread.php/17056-Dual-Triple-Display-Using-Two-GPU-s-%28Onboard-PEG-PCI%29-Simultaneously

  • How to Make a Bubbler Out of Household Items

    How to Make a Bubbler Out of Household Items

    Many of us battle daily with chores such as eating, sleeping, and common sense. Today I’m going to teach you how to make a tool that will help you battle these acts.

    Materials needed:

    • A lightbulb
    • Salt
    • Needlenose pliers

    The Process:

    1. First use the pliers to remove the metal plate from the end of the lightbulb
    2. Then hit the black part until it cracks/caves in and remove the chunks.
    3. CAREFULLY remove the filament from the bulb
    4. It is now a good idea to insert the pliers into the bulb to get rid of any glass left over from removing the filament. Be careful not to damage the bulb!
    5. Pour salt into the bulb and cover the hole
    6. “swish” the salt around until the bulb is completely clear
    7. Pour the salt out making sure there is none left behind.

    And there you have it. A perfectly good bub.

    Additionally you can:

    1. Heat up a silver dollar sized area on the bulb with a torch
    2. Apply direct heat to the center of the silver dollar sized area until it turns red hot.
    3. Blow as hard as you can into the bulb until the area opens creating a “carb”

    Discuss

  • How To Securely Erase Files On Windows

    How To Securely Erase Files On Windows

    Secure Data Removal

    An Overview

    To the untrained computer user, deleting a file on your computer using the general “highlight and delete” method seems to make the file disappear forever. However, these files can easily be recovered by any kind of file-recovery software, making the deleting process very insecure. If you have any kind of sensitive data on your hard drive and you delete it with this method, your privacy could be at stake!

    So, what do?

    Firstly, download this application.

    “Eraser is an advanced security tool for Windows which allows you to completely remove sensitive data from your hard drive by overwriting it several times with carefully selected patterns.”

    Instead of just normally deleting that sensitive file, give it a Gutmann 35-pass overwrite. This will securely overwrite your file 35 times, effectively zeroing it out as if it never existed. This makes the file completely unrecoverable.

    How To Erase a File

    Install the program, and boot it up. You can have a look through the config settings if you wish to. I usually just close the program after this, and resume computing as normal.

    When you need to securely erase a file….

    Right Click it, and select the “Eraser” option in the right click menu. It should be pretty self explanatory.

    And that’s all there is to it!

    Side Notes…

    Eraser supports the following levels of secure deletion;

    • Gutmann (35 passes)
    • Gutmann (Lite10 passes)
    • US DoD 5220.22-M (8-306./E, C & E) (7 passes)
    • RCMP TSSIT OPS-II (7 passes)
    • Schneier 7 pass (7 passes)
    • German VSITR (7 passes)
    • US DoD 5220.00-M (8-306./E) (3 passes)
    • British HMGIS5 (Enhanced) (3 passes)
    • US Air Force 5020 (3 passes)
    • US Army AR380-19 (3 passes)
    • Russian GOST P50739-95 (2 passes)
    • British HMG IS5 (Baseline) (1 pass)
    • Pseudorandom Data (1 pass)
    • First/last 16KB Erasure
  • Privacy 101 – How to Use Truecrypt

    Privacy 101 – How to Use Truecrypt

    By trx100


    What is Truecrypt?

    As written on the Truecrypt website, Truecrypt is – Free open-source disk encryption software for Windows 7/Vista/XP, Mac OS X, and Linux.

    Where should I download it from?

    http://www.truecrypt.org/downloads

    So, how do I create an encrypted file container?

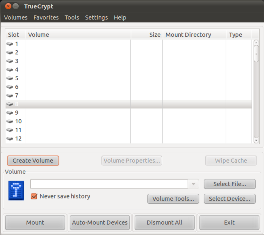
    Once you have downloaded and installed the Truecrypt software, you should go ahead and open it up. You should be presented with a window which looks something like this…
     

    Ubuntu Truecrypt

    • Click on the “Create Volume” button. From here, you can either create an encrypted file container on your HDD, or format an external drive or non-system partition which will then be encrypted. For the purpose of this tutorial, we’ll be creating an encrypted file container. If you wish to play around with the other option, it’s easy enough to follow and get working correctly.
    • Next, the program asks you if you wish to create a “Standard Truecrypt Volume”, or a “Hidden Truecrypt Volume”. The hidden option is fantastic, as it creates a container within a container, each with different passwords. This offers deniability in case you have to reveal your password – in which case you would reveal the password to your unimportant encrypted volume. For the sake of the guide though, we’re going to select Standard TrueCrypt Volume.
    • Choose your file location. Simple enough.
    • Choose your encryption strength and hash algorithm. I’d leave it all default (AES, RIPEMD-160).
    • Specify how much space you want to dedicate to your encrypted file container. Make it as big or as small as you need it to be.
    • Choose a password. Make it s STRONG password. Read the guidelines on creating a password, as using a dictionary word isn’t good at all. Make it significantly long, and jumbled.
    • Once you’ve done that, you need to decide on the type of filesystem you’re going to use. If you don’t, your filesystem won’t be able to be mounted by TrueCrypt and you wont be able to access your files. Just leave it on FAT.
    • Next up is the part where you need to move your mouse around the screen in a completely random manner. Do this for as long as you want, but remember that the longer you do it, the more random and strong the encryption keys will be.
    • Finally, hit the “Format” button. Your encrypted container has been created!

    How do I access the container?

    • Simple. When you’re on the main TrueCrypt screen, select a slot (anyone, it doesn’t matter). Then, hit the “Select File” button, browse to your encrypted container, and double click it. Once you’re brought back to the main screen, hit the “Mount” button, and put in your password.
    • Double click on the newly mounted drive, and use the encrypted file to your hearts content!

    Some words of wisdom by Negrophobe…

    From my basic knowledge and from confirmation from others who are better in the know with programming, there is no tampering or backdoors in thre.

    SERPENT 256 and TWOFISH 256 trump AES in algorithms; and truecrypt allows you to use all of them ontop of each other.

    Free encryption software is the best bet for you. You’re less likely to have some programmers who are doing this for free tricking you for the government. Obviously still check the source code (if it’s closed source it’s a good bet that it’s backdoored e.g. JAP) to make sure.

    With a laptop taken off the back of a van or where ever, with full encyption and random passwords on someone elses unsecure wifi; along with all flash drives encrypted and material saved onto; whilst using a VPN set up by you, or even tor; you should be relatively safe.

    Keep this hidden as well and have a decoy comp and PC which you use too.

    In the UK if they demand the password you can just give them the password to your work safe area whilst they can’t see any of the incriminating material, unless you give them the passphrase for that. Personally I would just stick with the 5 words instead of making their job easy.

    I’d recommend reading the dr who manual (I’ll upload it when I find which flash drive it’s on)

    Here’s some good links for you:

    You have nothing to lose and everything to gain, if you keep your mouth shut.


    Discuss

    http://www.totse.info/bbs/showthread.php?t=8082